As we just release a new version of our software, so we decided to also update this post.
Hope you enjoy.
Would you like to use with your Developing Board like (Pluggable Development Board for ATtiny13A/ATtiny25/ATtiny45/ATtiny85 Programming Editor Micro Usb Power Connector), or to use them like a Digispark solution, or even create your own like Paperduino.
Here, we will go to show you in a simple way how to get there.
What is Micronucleus Bootloader?
I have the bootloader and now?
What you will go to need?
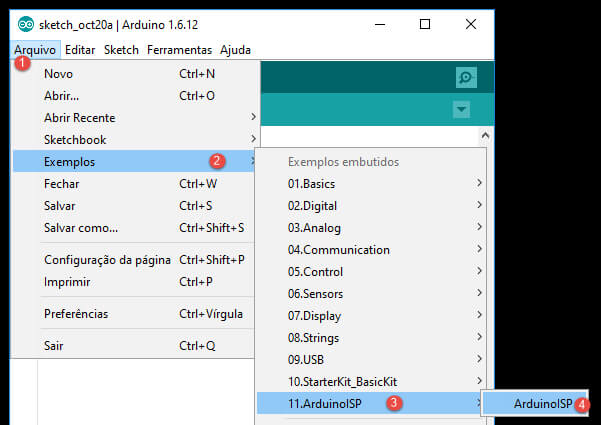
Installing Arduino ISP:
Assembly in a Breadbord – ISP (In system Programmer)
Adding Digispark Board to the Arduino IDE.
Flashing the Bootloader
Troubleshooting
Extras
Subscribe in our Youtube channel
What is Micronucleus Bootloader?
Micronucleus is a bootloader designed for AVR Attiny microcontrollers with a minimal USB interface, cross platform libusb-based program upload tool, and a strong emphasis on bootloader compactness. To the authors knowledge this is, by far, the smallest USB bootloader for AVR Attiny.
In order to download the last version of micronucleus, access the following link. Also, you can access our download area, to get the same version we have tested during the last few months.
I already have the bootloader, what to do now?
That is a really good question, I have found several tutorials and none of them could help me at all. Lots of tutorials are being made considering different level of knowledge. Take this in consideration we have developed a simple solution using avrdude and micronucleus. By the utilization of our solution you will be able to flash a Micronucleus bootloader in an easy way. Just connect the Attiny in your Arduino with ISP connection and press the button.
Don’t worry about any kind of configuration. If you are an advanced user, probably this is too much simple for you, however still useful.
So, in the next line we will go to show you step by step.
What you need?
Arduino/Genuino/Uno, Duemilanove, Mega, Nano, board (1) – he have tried these ones.
Pluggable Development Board For ATtiny13A/ATtiny25 (1)
Breadboard (1)
Capacitor -10µF (1)
Jumper wires (some)
LEDs (for test)
Resistors 220 Ω. (for LEDs)
Installing Arduino ISP:


Assembly in a Breadbord – ISP (In system Programmer)
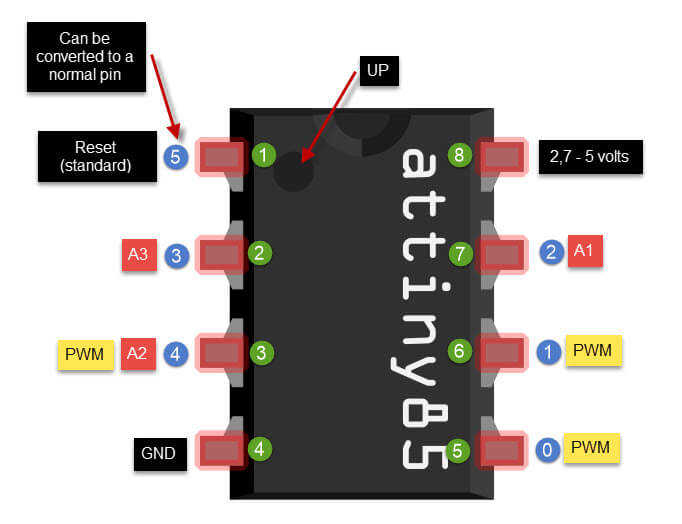
| Attiny85 Pin | Arduino Pin |
| 8 | 5v |
| 7 | 13 |
| 6 | 12 |
| 5 | 11 |
| 1 (Reset) | 10 |
| Capacitor | |
| Reset (+) | Gnd (-) |
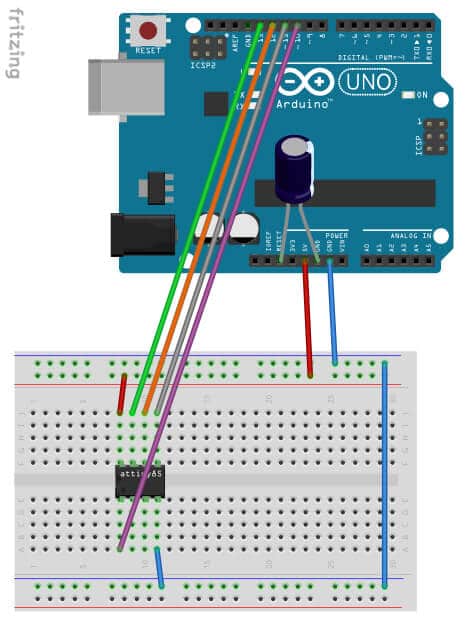
Assembly in the Arduino board, already with ISP Firmware.
Adding Digispark Board to the Arduino IDE.
Follow exactly the steps mentioned in the following link until you reach the post message : ” The install is now complete!”
Flashing the Bootloader
Download the FlashBootloader_HackEduca_V2.0.rar in our download area (under Arduino session) By this software you will be able to flash the Micronucleus Bootloader.
Not needded an Arduino IDE in this step
It is necessary that your Arduino board have uploaded the ArduinoISP program
It is necessary that your Arduino is connected to the microcontroller (ISP connection)
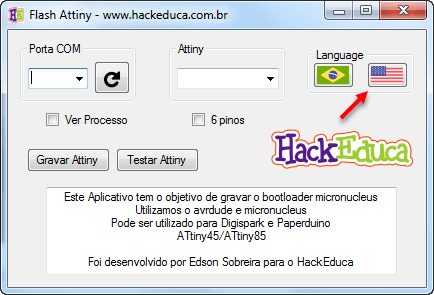
Choose your Language
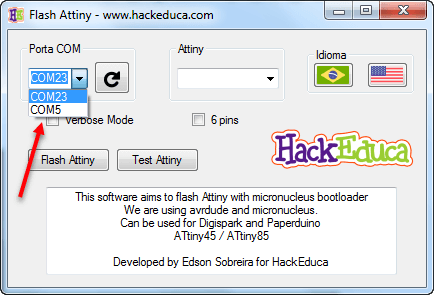
Select the correct Serial Port – where your Arduino is conected
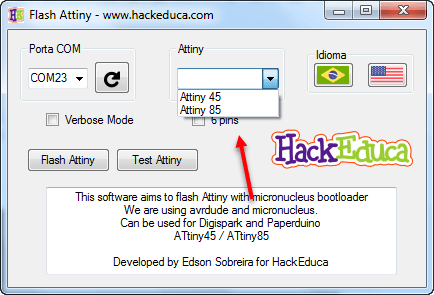
Select the correct chip
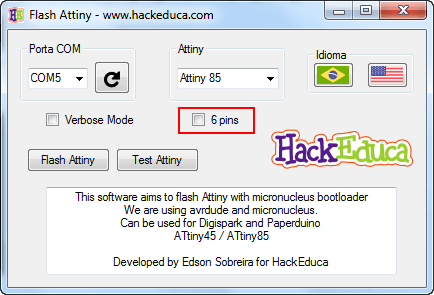
Warning: Select 6 pins (without Reset) This process cannot be reversed without a HVP (12 volts) Unselected means 5 pins (with Reset)
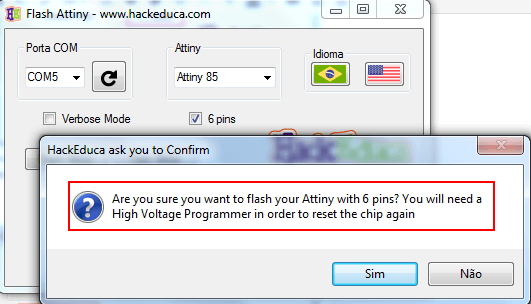
Always is important to remember…… Are you sure?
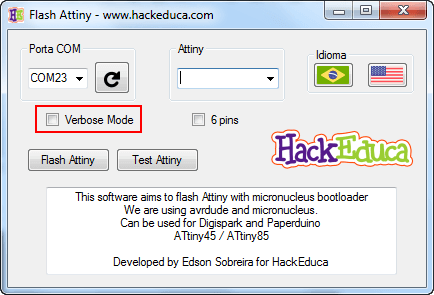
In a Verbose Mode you can follow what is happening in a prompt screen
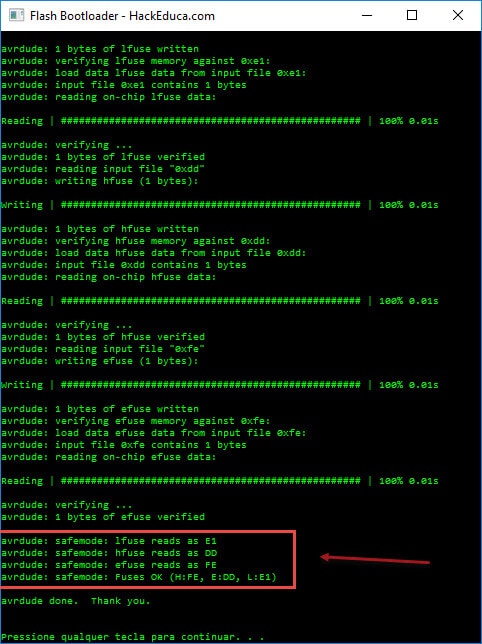
Verbose Mode: This message shows that you succeed in the process
Now is time for a double check
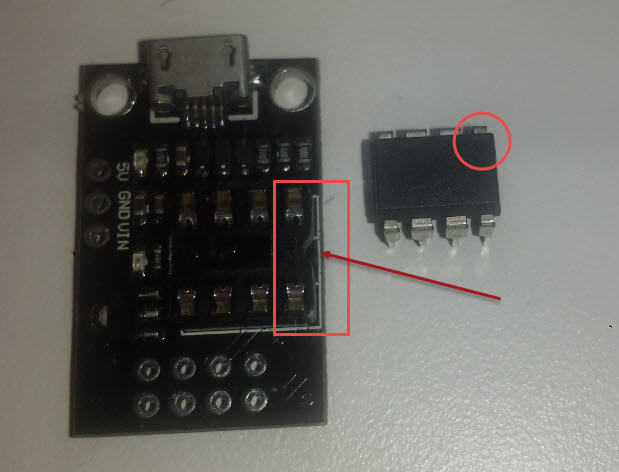
Make sure you get the polarity correct. The small, etched circle on the microcontroller should line up with the “notch” on the socket, otherwise your board will burn

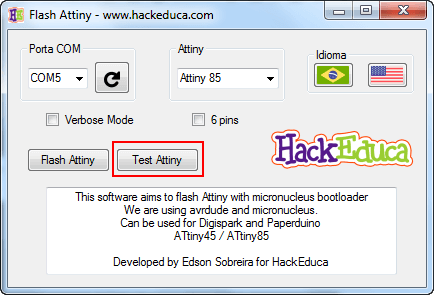
Get your board, a good cable and the microcontroller flashed
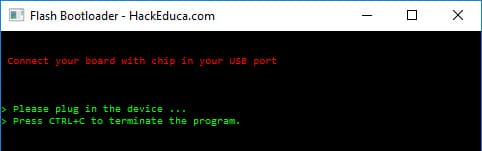
The system is waiting for connection
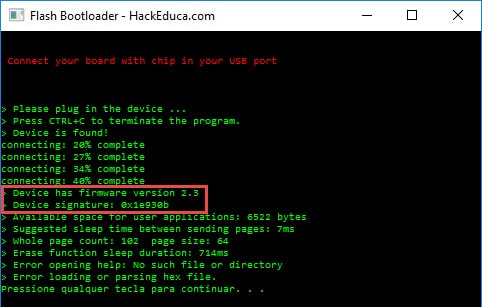
This message informs your that everything is OK!
Troubleshooting
- Can’t find the COM port with Arduino connected.
- Try to replace your cable, change your USB port that your Arduino is connected
- Dll missing – libusb0.dll
- In this case you have two options:
- Install an Arduino IDE
- Install the WinAVR software in the following link link:
- In this case you have two options:
- Windows cannot recognize the flashed chip (already in the developing board)
- Install the drive delivered in the Micronucleus folder
- Windows cannot recognize even after driver installed
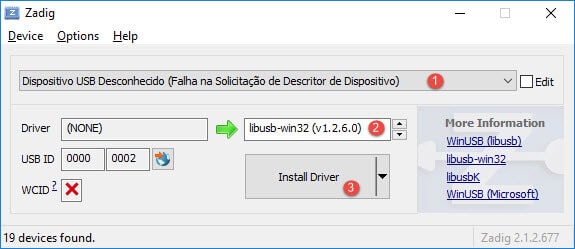
- Install the driver again, however now choose the software ZADIG to make the process
- Choose your device (not recognized) (1)
- Choose libusb (2)
- Install Driver (3)
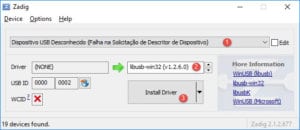
- Install the driver again, however now choose the software ZADIG to make the process
- Windows still cannot recognize even after the above mentioned steps.
- Change your USB cable
- The cable must be a good one, preferable an USB 2.0 ready cable (we have several issue, that were solved by cable replacement)
- Change your USB cable
Extras
- Clock
- Usually Attiny works well with 1mhz clock, however Digispark works with 16mhz. This process change your chip to 16mhz
- In case you want to change to 1 mhz, or 8 mhz, use the method described in this tutorial (link here), after you finalized the assembly go to IDE do Arduino [Tools] ->Select your Board (Chip) –>Choose the Clock –> [Burn Bootloader].
- Digispark works with 6 pinos as I/O and this method cover 5 pins only (1 reset, 1 Vcc and 1 Gnd)
- This method considers only 5 pin + 1 reset, 1 ground e 1 Vcc because we still want to make this chip able to receive update via ISP.
- It’s possible, however not recommended, the conversion from reset to I/O, however keep in mind that you cannot restore this process using an ISP method. You have to use a high voltage programmer.
- In case you really want to convert your reset pin into a I/O pin, use our software called FlashBootloaderAttiny_without_Reset in our download area, under Arduino folder
Leave your comments

This work by Edson Sobreira is licensed under a Creative Commons Attribution-ShareAlike 4.0 International
Based on a work at http://paperduino.eu/doku.php


2 Comments
So, After uploading this bootloader I’ll be able to recognize the board with an Attiny in it? and program it using arduino IDE?
Yes, this is the idea, because by this bootloader your device will be possible to emulate a COM port in your computer.